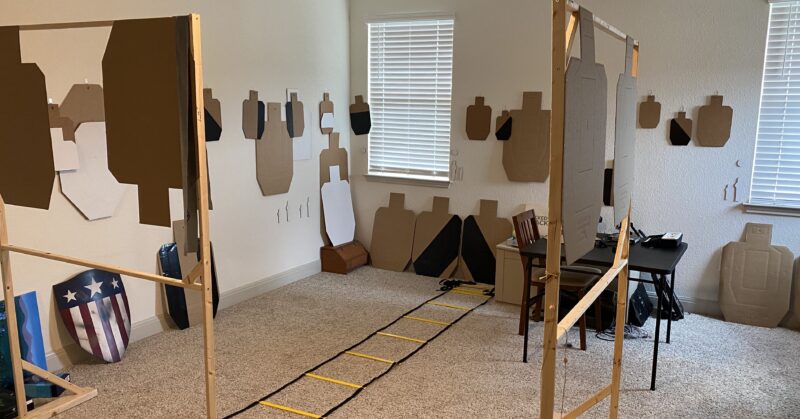
How to Set up a Dry Fire Dojo
Set up a training environment for dry fire at home.

While it certainly is very cool to have a dedicated dry fire dojo with targets, walls, and other training tools everywhere – such an elaborate setup is not needed. A LOT can be done with three targets on the wall and five to ten yards of available distance.
But it’s not hard to get a very good setup for dry fire at home. On top of that, most of these solutions can be easily set up and taken down so you don’t mess up the decor of the house!
The key with all dry fire training is to stay safe by ensuring sure live rounds aren’t anywhere in the dry fire area and guns are unloaded during dry fire and kept out of the hands of unauthorized use between dry fire sessions. Always check the status of a firearm before beginning a dry fire session.
Setting up for specific drills or drill sets
I say again to really emphasize the fact that it isn’t difficult, nor does it take up much room, to run the vast majority of dry fire drills.
A LOT of great work can be done with three targets and a clear space on the floor.
There’s no need to over complicate things for an at home dry fire dojo. While a large setup can be great and allow for a lot of different things, all of the core shooting skills can be worked with a little room and minimal setup.
Minimum for a Dry Fire Dojo
- 5 yards distance
- 3 yards laterally
- 3 targets on the wall ahead
- 2 fault lines and/or cones to move around
Ideal for a Dry Fire Dojo
- 10 yards distance
- 5+ yards laterally
- 5+ targets on the wall ahead
- 5+ targets on the side walls
- 2+ fault lines and/or cones to move around
- Moveable objects to act as vision barriers, or using existing doors/walls for vision barriers
Target Types
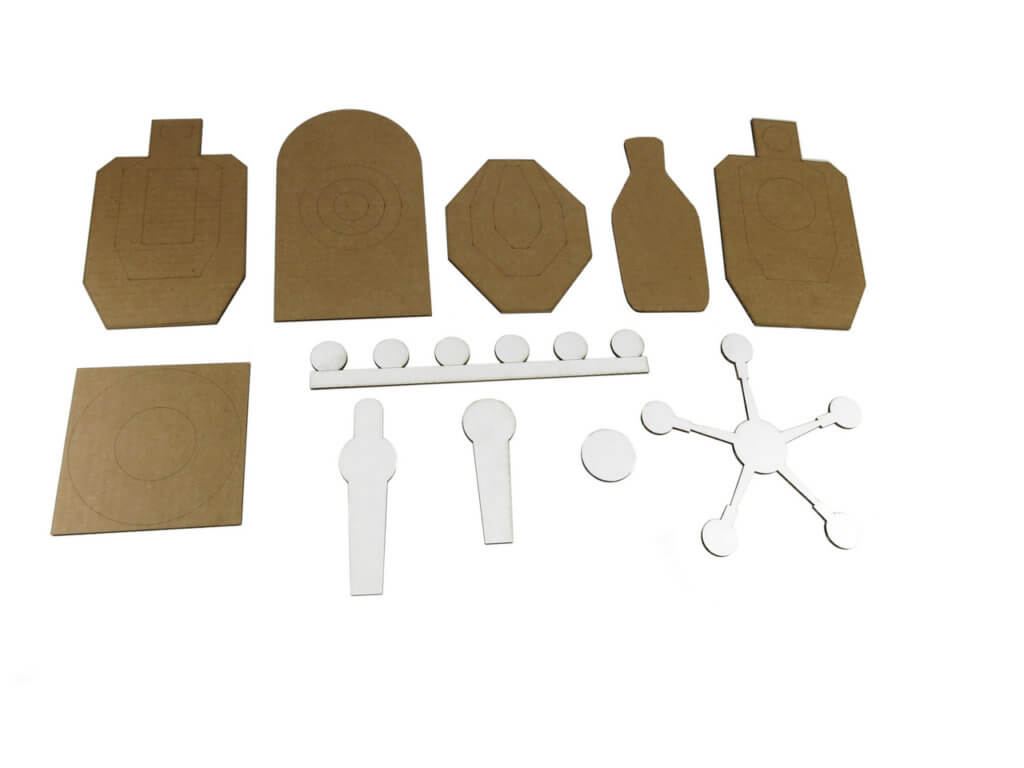
A very common target type are USPSA targets and IDPA targets. They’re brown cardboard targets in the rough shape of a human torso.
The USPSA targets have a rectangular central A Zone (Alpha) in the torso and the headbox, followed by a C Zone (Charlie) outside that, and a D Zone (Delta) on the outer edges. In USPSA scoring, Alphas are worth 5 points, Charlies are worth 4 or 3 points for major and minor scoring respectively, and Deltas are worth 3 and 2 points.
IDPA targets have a circular central “Down Zero” zone in the center torso and headbox, followed by a “Down One” outside that, and a “Down Three” zone on the edges.
IPSC “turtle” targets are used outside the USA and aren’t shaped like a torso, but they have the same Alpha, Charlie, Delta scoring zones as USPSA targets do.
Purchase USPSA & IPSC targets: Challenge Targets or Action Target
Purchase IDPA Targets: Action Target

Reduced Size Targets
Reduced sized targets are a fantastic way to simulate greater distances when there isn’t as much room available. These targets are best utilized in dry fire and can turn a small living room into a 25+ yard shooting range for dry fire.
Simulated size targets tend to come in half size, third size, and sixth size. Therefore, a target placed at 5 yards would simulate 10 yards if it were half size, 15 yards if it were third size, and 30 yards if it were sixth size.
I LOVE dry firing at home with reduced size targets as they help push distances beyond what I would otherwise be able to create. My favorites are half size and third size targets. Personally, I don’t like training with sixth size targets as they get too small and the realism gets stretched.
Purchase reduced sized targets: Ben Stoeger Pro Shop or Go Fast, Don’t Suck
Simulated Steel
Steel targets are commonly used in shooting competitions, but they’re great even for non-competitors. They’re small and since they’re simulating steel targets where it’s a hit or miss, no scoring zones, they can work as “no fail” targets for training.
They can also be purchased from the Ben Stoeger Pro Shop or Go Fast, Don’t Suck.
Simulated Human Targets
There’s a WIDE variety of other human shaped targets. Some have bullseye style scoring zones like CCW test targets (but the center of the scoring zone is in a poorly chosen place) and some have anatomical diagrams. Personally, I like my dry fire targets simple.
Action Targets has a wide variety of other types of targets to choose from if that’s your jam.
Improvised Targets
Don’t want to spend money on new targets? Spouse doesn’t want a new target decoration theme to the living room? Virtually anything could work as a simulated target. From household goods (like paper plates) or things already on the wall (like light switches), don’t let a lack of targets keep you from getting out there and dry firing.
Moving Targets
Tracking moving targets is an excellent vision training exercise, and little home swinger targets can be fun ways to work on moving targets! They’re simple, surprisingly cheap, and are a great addition to any dry fire.
Go Fast, Don’t Suck has some moving targets for dry fire.
And Many more…
There are MANY more different types of targets out there. From goofy/fun ones like 2v2 Battleship, to bullseye, and more. I can’t cover them all here, I’ve simply hit on the more common targets used for dry fire.
Ways to hang targets so they can be rearranged
There are ways to hang up dry fire targets at home so they can be easily taken up and down. This can keep a room’s decoration from becoming the “competitive shooter” style (even though I’m a fan of that style) and it helps keep variety up in training by allowing targets to easily move around.
Little small clear 3M hooks can be hung up on the wall, making it super easy to simply rearrange targets at will.
Putting painter’s tape on the back of targets also allows targets to come up, down, left, or right. Painter’s tape generally doesn’t damage paint if they aren’t left up for a year.
Fault Lines
Fault lines are simply markers on the ground used to mark out different shooting areas. In many movement drills we want to use a marker to force you to move far enough to meet the point of the drill.
Little pieces of 1x2s from Home Depot can make for great fault lines. They’re small and easily moveable. However, they can be slipped on, particularly if they are placed on hard floors.
Painters tape can make for great moveable fault lines that won’t cause you to slip and fall. However, they’re generally best used on tile or concrete floors.
Moveable Walls and/or Vision Barriers
Some houses are lucky and have a conveniently placed walls, doors, or columns to create vision barriers for drills. But not always. Vision barriers are worth trying to get setup if you can as they’re great for forcing leans and blind target acquisitions. But it’s not the end of the world if that isn’t in the cards.
A lightweight moveable wall can be made out of 2x4s and 1x2s and targets hung on it to create vision barriers. PVC pipes can do the trick too.
Extendable tripods can be purchased on Amazon for under $20. They’re small, easy to move, and can be set up and taken down very quickly and easily to not dirty up the house.
Ladders can work quite well. Putting a target on it or draping a sheet over it creates an excellent vision barrier.
Dummy Rounds
While not technically part of the room’s setup for dry fire, I believe dummy rounds are a very important component as it helps keep dry fire safe, it protects magazines from damage, and it helps keep gun weight realistic.
I put a plastic bright orange dummy round at the top of my magazine and a bunch of weighted dummy rounds blow it. The bright orange makes it abundantly obvious that it’s a magazine loaded up with dummy rounds and the dummy rounds help protect the magazine feed lips from damage. Weighted dummy rounds help keep the magazine (and the gun) at a more realistic weight.
Dummy rounds of assorted types can be purchased from the Ben Stoeger Pro Shop.
Barrel Blocks are also useful for Dry Fire safety. They’re simple plastic rods to stick into handgun barrels. The plastic rod can stick out the barrel to provide a visual indicator of an empty chamber while also blocking the chamber from firing any live rounds.
What About Other Training Tools?
There are a LOT of dry fire gimmicks out there. Some of them are straight up gimmicks that don’t help your dry fire, and some of them are even great for creating bad habits. Some can be useful, but only minimally useful and in niche uses.
Without getting into bashing this or that gadget, the main takeaway is you don’t need anything to dry fire except an empty gun and a target. Dry fire doesn’t have to be complicated – and it shouldn’t be complicated. Dry fire is simply going through the actions of shooting and manipulating a gun, except there’s no recoil and no holes in walls. One of the greatest benefits of dry fire is that there’s no recoil as it provides incredibly valuable diagnostic information through our sights.
Most dry fire training tools provide some nice short term quick skill gains – which is why they remain popular. However, they create premature skill plateaus and artificially lower the skill ceiling thanks to bad habits. They should generally be avoided if you really want to get good.
A dry fire dojo doesn’t have to take over the house
The best dry fire setup is one that is set up and left up. This lowers the barrier to go train. The easier it is to start training, the more often we train and the less time is spend on setup and more time on training.
But not every household can devote a large space to dry fire, and not all family members appreciate the aesthetic of targets lying around. Even so, it’s very doable to have targets go up and down quickly and easily.
Whatever works best for you and your household, just get something up and get to training.
Written by Brian Purkiss - always a student, sometimes a teacher.
I don't consider myself a competition shooter - I think of myself as a performance pistol shooter. I am all about performing at as high of a level as possible. Towards that end, I am obsessive about learning how to perform. I spend a lot of my life learning from the best across the entire firearms world and even into other areas of performance and other sports. I am a USPSA Carry Optics Grandmaster, currently working towards my second GM title in the Open division.
Want more? Follow on Instagram, Facebook, or Email.
|